Masonry Outdoor Fireplace Inspection Checklist: What Inspectors Check at Each Stage
Understanding each inspection stage before it happens saves costly rework. Here's what inspectors look for at every stage of a masonry outdoor fireplace or fire pit project.
Updated May 20258 min read
⚠️
Inspection requirements vary by jurisdiction. This checklist reflects common practice — your building department may require different or additional inspections. Confirm your specific inspection sequence with your permit when it's issued.
Before Any Work Begins: Confirm Your Inspection Sequence
When your permit is issued, the permit card or attached conditions will specify the required inspections and the sequence in which to call for them. Read this before breaking ground. Calling for the wrong inspection, or starting the next phase before passing the current inspection, is the most common mistake that causes costly rework.
Most masonry outdoor fireplace projects require three to four inspection stages. The permit card must be posted at the job site and visible to the inspector at every stage.
Stage 1: Footing
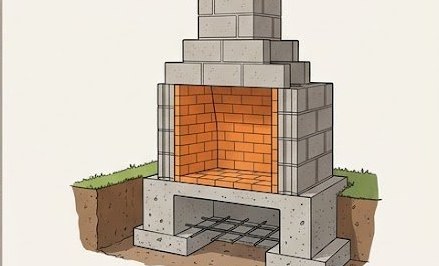
The four components inspectors verify: concrete footing (below grade), CMU block structure, firebrick firebox lining, and spark arrestor cap. / Foundation Inspection
Called for before pouring concrete for the foundation or footing. Do not pour until the inspector has approved.
What inspectors check:
Footing dimensions match approved plans (typically minimum 12 inches deep, but verify locally)
Footing extends below frost line (in cold climates — typically 12–36 inches depending on your zone)
Rebar placement and size per approved structural drawings
Soil bearing capacity appears adequate (visual check — no soft spots, fill soils, or water)
Setback compliance confirmed on ground (inspector may measure from property line and structures)
Common failures: Footing not deep enough; rebar missing or wrong size; footing dimensions don't match plans. Have your plans on site and have a tape measure ready — inspectors will want to verify dimensions.
Stage 2: Rough Masonry Inspection
Called for when firebox walls are constructed and masonry is up to the mantel or opening height, but before any veneer, finishing stone, or facing is applied that would conceal the structural masonry.
What inspectors check:
Firebox dimensions per approved plans (height, depth, opening width)
Firebox lining material (firebrick and refractory mortar in the firebox itself, not standard brick)
Smoke chamber construction (smooth, no corbeling beyond 30 degrees per standard)
Throat damper installation if required
Lintel support over firebox opening (proper steel angle or masonry arch)
Clearances to combustible framing (if fireplace is near or attached to a structure)
Common failures: Standard brick used in firebox instead of firebrick; smoke chamber corbeled too aggressively; no damper when required. Get your masonry materials verified before ordering — the difference between firebrick and standard face brick is significant.
Stage 3: Chimney Inspection
Called for when the chimney is constructed to full height but before the chimney cap is installed. In some jurisdictions this is combined with the rough masonry inspection.
What inspectors check:
Chimney height meets minimum requirements: 2 feet above any combustible surface within 10 feet horizontally; 3 feet above roof penetration if chimney passes through a roof
Chimney wall thickness per code (typically 4-inch minimum for masonry chimneys)
Flue size relative to firebox opening (standard ratio: flue area = 1/10 of firebox opening area)
Crown or wash: proper slope on top of chimney masonry to direct water away from flue
Spark arrestor (chimney cap) specified and ready for installation (or already installed)
Common failures: Chimney too short (most common); flue undersized relative to firebox; no chimney crown detail. Address chimney height early — adding height after the chimney is built requires significant masonry work.
Stage 4: Final Inspection
Called for when all work is complete, including cap installation, finishing stone or veneer, and any hearth extension work.
What inspectors check:
Spark arrestor (UL-listed mesh cap) installed
Hearth extension dimensions if required (combustible flooring protection in front of firebox opening)
All work matches approved plans
Combustible clearances maintained in finished state
Gas line pressure test passed (if applicable — this is typically a separate inspection)
Site cleanup and drainage not affected by new construction
What you get at final: The inspector signs off the permit card, marks the permit as complete in the system, and you receive a certificate of completion or final inspection approval. Keep this documentation with your property records.
Gas Line Inspection (If Applicable)
If a gas line was installed to the fire feature, the gas line inspection is typically a separate sequence under the plumbing permit:
Pressure test inspection: Called for before the gas line is buried or concealed. The licensed plumber pressurizes the line and holds pressure for the inspector. No burial before this inspection passes.
Final plumbing inspection: Verifies all gas connections, appliance hookup, and shut-off valve installation.
📋
Free Site Plan Checklist PDF
Covers what your building department needs at permit application — before any inspections begin.
Fire Pit Spark Screen, 24 Inch Round — Heavy Duty Mesh Cover with Handle & Poker
Most building departments and the IFC require a spark arrestor on any wood-burning fire feature. A heavy-duty mesh spark screen is typically what inspectors look for during the final inspection of masonry fire pits and fireplaces. Collapsible design with handle and poker — 24-inch round fits most standard fire pits.
As an Amazon Associate, FireFeatureRules earns from qualifying purchases. Price subject to change. Last verified June 2025.
Disclaimer: Inspection requirements vary by jurisdiction. This checklist reflects common practice. Always confirm your specific inspection requirements with your building department when the permit is issued.